Author: admin

  • Alpinestars Tech 3 Motocross Boots: Features, Fit, Protection, and Off-Road Riding Considerations

    Alpinestars Tech 3 Motocross Boots: Features, Fit, Protection, and Off-Road Riding Considerations

    Introduction

    Off-road motorcycle riding places different demands on footwear than everyday commuting or casual motorcycle travel. Dirt tracks, motocross circuits, rocky trails, and uneven terrain can expose a rider’s feet and lower legs to impacts, twisting forces, flying debris, and contact with the motorcycle. Appropriate riding boots are therefore an important part of preparing for off-road activities.

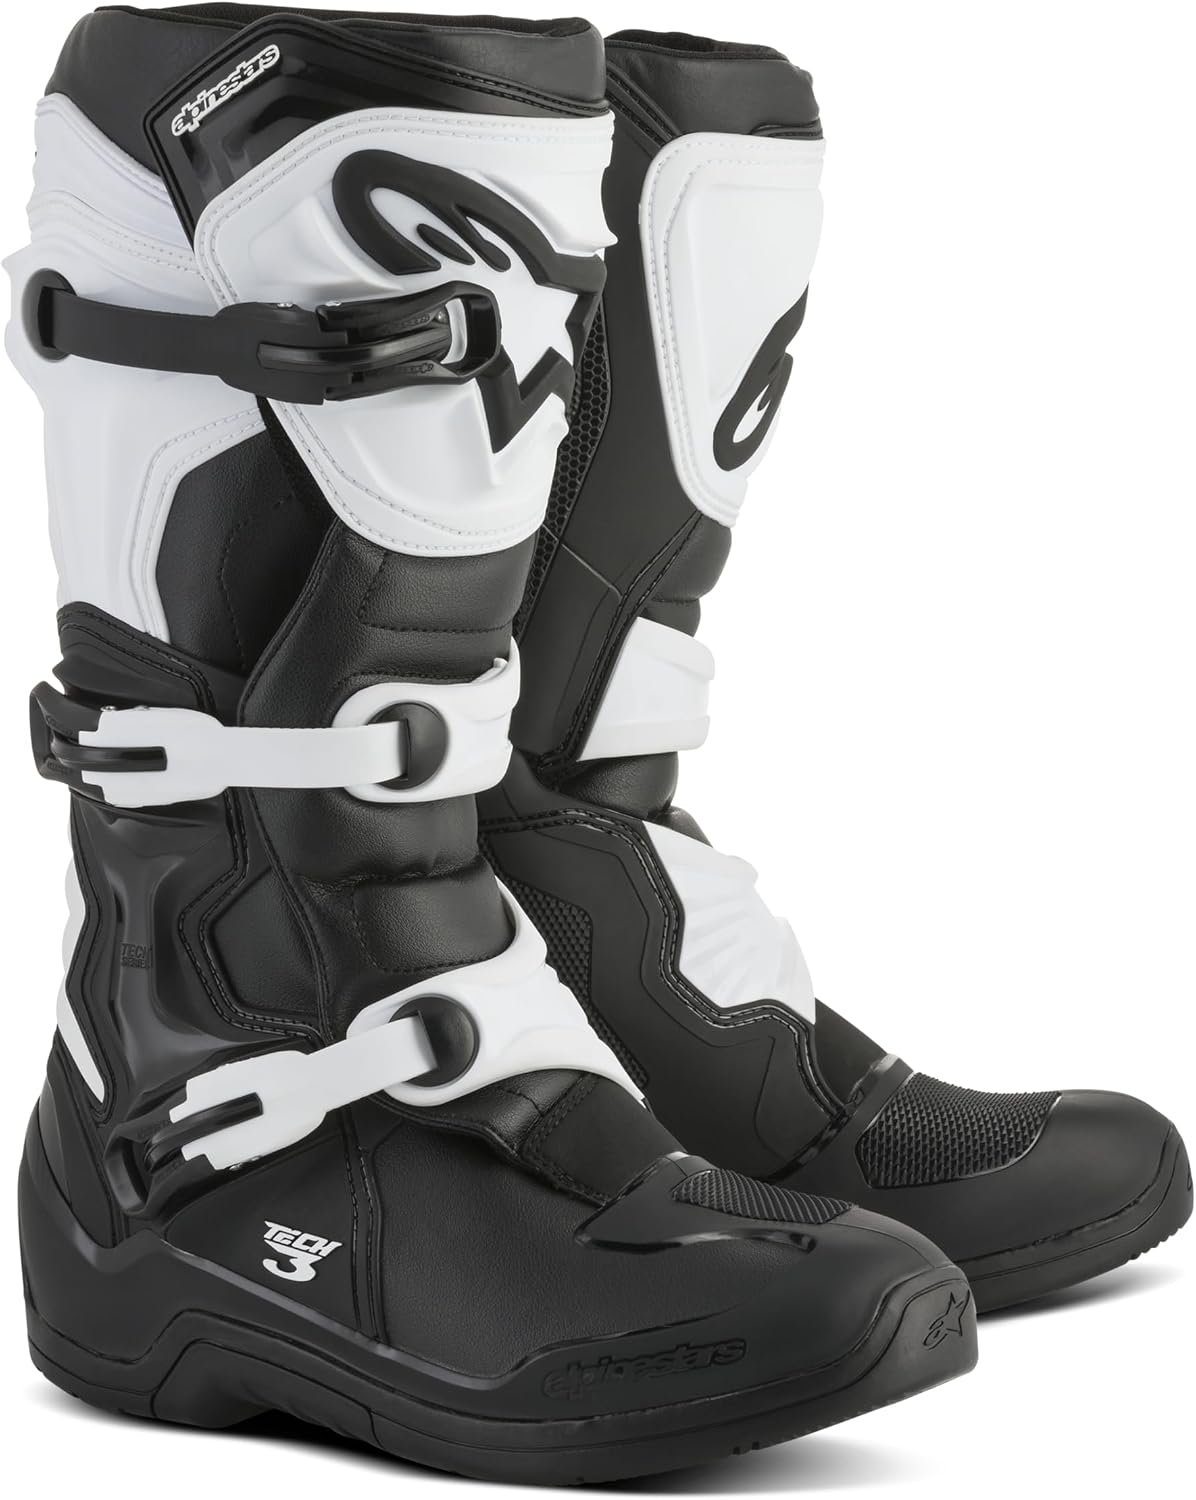
    The Alpinestars Tech 3 Motocross Boots are designed for off-road powersports and are associated with the protective footwear category used by motocross riders and trail enthusiasts. The product listing describes them as durable, lightweight, and CE-certified, with the referenced version featuring a black-and-white color scheme and size 6.

    Motocross boots generally combine a structured outer construction, reinforced areas, a supportive fit, and closure systems intended to help keep the footwear securely positioned during riding. These features can provide a more protective design than ordinary trainers or casual outdoor boots. However, protection depends on the boot’s construction, fit, condition, certification details, and suitability for the rider’s particular activity.

    Choosing motocross footwear also involves practical considerations. A boot needs to fit comfortably while accommodating riding socks and any appropriate protective equipment. It should allow the rider to operate the foot controls while providing suitable support, and it should be compatible with the rider’s motorcycle, riding position, and terrain.

    This guide explores the Alpinestars Tech 3 motocross boots, the general features associated with off-road riding footwear, practical use cases, fit and maintenance considerations, and the differences between motocross boots and other types of motorcycle footwear.

    The goal is to provide useful information for riders considering this style of boot without making unsupported claims about performance or suggesting that any footwear can eliminate the risk of injury.

    What Are the Alpinestars Tech 3 Motocross Boots?

    The Alpinestars Tech 3 is a motocross boot model intended for off-road motorcycle use. Alpinestars is a motorcycle equipment brand known for producing riding apparel and protective gear, including footwear designed for different riding disciplines.

    Motocross boots are typically built to provide a structured barrier between the rider’s lower leg and the surrounding environment. Their design may incorporate reinforced areas around the toe, heel, ankle, shin, and calf, depending on the model and version.

    The Tech 3 model is positioned within Alpinestars’ off-road boot range. The supplied product title identifies the referenced version as durable, lightweight, CE-certified, black and white, and size 6.

    Product versions can differ, so buyers should confirm the exact model year, size system, construction details, and certification information from the current listing and manufacturer’s documentation. The product title alone does not establish every material, protective component, or technical specification.

    It is also important to understand what motocross boots are intended to do. They are designed as part of a broader riding protection system, not as a guarantee against injury. Their effectiveness depends on proper fit, correct use, condition, and the demands of the riding environment.

    Key Features of the Alpinestars Tech 3 Motocross Boots

    1. Purpose-Built Off-Road Design

    Motocross and trail riding involve movements and contact conditions that differ from ordinary walking. Riders may stand on the footpegs, shift their weight repeatedly, move through ruts, and encounter rocks, branches, and other obstacles.

    Off-road boots are generally designed with these demands in mind. They often use a more structured construction than casual footwear, with protective elements intended to help reduce exposure to impacts and abrasion.

    The Alpinestars Tech 3 is marketed for motocross and off-road powersports. This makes its intended category clear: it is specialized riding footwear rather than an everyday boot designed primarily for walking or fashion.

    The precise protective features of the referenced version should be confirmed through its official specifications. Riders should not assume that all motocross boots offer identical levels of ankle support, shin coverage, or impact resistance.

    2. Structured Protection Around the Foot and Lower Leg

    A central purpose of motocross boots is to provide more coverage and structure than ordinary footwear. Depending on the model, off-road boots may incorporate reinforced toe areas, heel protection, ankle support structures, and shin guards.

    These elements can help manage some of the forces and contacts associated with riding. They may also reduce direct exposure to stones, dirt, and other debris encountered on trails or tracks.

    The exact construction of the Tech 3 should be checked in the manufacturer’s documentation. A general description of the motocross boot category should not be treated as confirmation that a specific model contains a particular brace, insert, or reinforcement.

    Fit is equally important. Protective components need to remain correctly positioned when the rider bends the knees, moves the ankles, and operates the motorcycle’s controls. A boot that shifts excessively or does not close properly may not provide the intended coverage.

    3. Durable Construction for Off-Road Conditions

    Off-road footwear is exposed to abrasion, dust, mud, water, repeated flexing, and contact with motorcycle components. Durable materials and construction can help a boot withstand these conditions over time.

    The product listing describes the Tech 3 boots as durable. In practical terms, durability depends on the materials, stitching, protective components, closure hardware, maintenance, and intensity of use.

    Motocross boots may experience concentrated wear around the toe, sole, buckles, and areas that contact the motorcycle. Regular inspection helps identify problems before they become more serious.

    No boot should be considered indestructible. Abrasion, impacts, improper storage, or repeated exposure to unsuitable chemicals can affect the materials. If a buckle fails, a sole separates, or a protective component becomes damaged, the boot should be assessed before further riding.

    4. Lightweight Design Considerations

    The supplied product title describes the Tech 3 boots as lightweight. Weight can influence how footwear feels during long riding sessions, especially when riders repeatedly lift their feet, shift position, or move around the motorcycle.

    However, lightweight construction should not be interpreted as proof of superior protection or greater comfort for every rider. Weight varies by size and configuration, and the overall experience depends on the boot’s fit, flexibility, stiffness, and balance.

    A rider may prefer a boot that feels easier to move in, while another may prioritize a more substantial structure for a particular riding discipline. The appropriate balance depends on the type of riding and the rider’s needs.

    If weight is a key selection factor, compare the manufacturer’s documented specifications for the exact size and version rather than relying only on a general product description.

    5. Closure and Retention System

    Motocross boots commonly use buckle-based closure systems to help secure the foot and lower leg. Depending on the model, these systems may allow adjustments at several points along the boot.

    A secure closure helps the footwear remain in position while the rider moves. It also makes it easier to achieve a repeatable fit from one ride to the next.

    The exact buckle design and adjustment features of the referenced Tech 3 version should be confirmed in the product documentation. Do not assume that every model in a product family uses identical hardware.

    Before riding, check that the closures engage correctly and that no strap, buckle, or fastening component is damaged. The boot should feel secure without causing excessive pressure, restricting circulation, or producing painful contact points.

    6. Sole Design and Footpeg Contact

    The sole of an off-road boot influences grip, durability, walking comfort, and the way the rider feels the motorcycle’s footpegs.

    Motocross footwear often uses a sole designed for riding rather than for everyday walking. Its tread pattern and stiffness can affect traction on the ground and the rider’s interaction with the controls.

    The exact sole construction of the Tech 3 should be verified through official specifications. Different riding disciplines may place different demands on sole flexibility, grip, and resistance to wear.

    Riders should pay attention to the condition of the sole, particularly around the toe and the areas that repeatedly contact the footpegs. Excessive wear, separation, or damage may affect usability and should be assessed before riding.

    7. Black-and-White Color Scheme

    The referenced product listing identifies a black-and-white version of the Alpinestars Tech 3 boots.

    Color is primarily a matter of personal preference and coordination with the rest of a rider’s equipment. Some riders prefer neutral colors that match different jerseys, pants, and protective gear, while others choose brighter designs for a more distinctive appearance.

    The practical considerations are more important than the color alone. Riders should check the exact listing images to confirm the version being purchased, because similar models may be offered in different colorways or configurations.

    Appearance does not establish the level of protection. Two boots with different colors may share a similar design, while boots that look alike may have different specifications or certification details.

    8. CE-Certification Considerations

    The product title describes the boots as CE-certified. In Europe, CE marking indicates that a product is represented as meeting the applicable requirements under relevant European legislation. Protective motorcycle footwear may fall under regulations governing personal protective equipment.

    For motorcycle boots, the relevant standard and certification details matter. EN 13634 is a European standard associated with protective footwear for motorcycle riders. Different editions and certification levels may specify different testing criteria.

    However, the words “CE-certified” in a product title are not enough to establish the exact certification level, standard edition, or test results for a particular pair. Buyers should check the product label, declaration of conformity where applicable, and manufacturer documentation.

    Certification should be considered alongside fit, condition, and intended use. It does not mean that the boots eliminate injury risk or guarantee protection in every crash scenario.

    9. Fit for Motorcycle Riding Positions

    A motocross boot must work with the riding position and foot controls of the motorcycle. Riders may need to move between standing and seated positions, operate the gear lever, and use the rear brake while maintaining balance.

    A boot that is too large can move around the foot, while a boot that is too small can cause discomfort and restrict movement. Excessively bulky footwear may also make control operation more difficult.

    Fit should be assessed while wearing the socks normally used for riding. The rider should check heel retention, toe room, ankle movement, shin coverage, and closure adjustment.

    The appropriate amount of flexibility depends on the boot’s design. Some stiffness is normal in protective riding footwear, but pain, numbness, or an inability to operate the controls safely indicates that the fit or model may not be suitable.

    How the Alpinestars Tech 3 Boots Can Be Used

    1. Motocross Track Riding

    Motocross takes place on purpose-built tracks that may include berms, jumps, ruts, uneven surfaces, and changing traction. Riders need equipment suited to repeated movement, footpeg contact, and the possibility of falls.

    Motocross boots are designed for this general environment. Their structured construction can help provide coverage and support compared with casual footwear.

    The Tech 3 boots are marketed for motocross and off-road powersports, making track riding one of the activities relevant to their intended category. Riders should still select equipment according to the track’s rules, their riding experience, and the rest of their protective gear.

    Boots are only one part of preparation. A suitable helmet, gloves, eye protection, riding pants, and other appropriate protective equipment remain important.

    2. Trail Riding

    Trail riding can involve dirt, loose stones, roots, uneven ground, and occasional walking when a rider needs to move the motorcycle or navigate a difficult section.

    A purpose-built off-road boot may offer useful coverage against debris and accidental contact. Its sole and structure can also influence how the rider interacts with footpegs and the ground.

    However, motocross boots may feel stiff during extended walking compared with hiking boots or footwear designed specifically for enduro and adventure riding. Riders should consider how much walking their usual routes involve and whether the boot’s design matches those demands.

    For longer trail outings, fit and comfort become particularly important. Pressure points that seem minor during a short fitting may become more noticeable over several hours.

    3. Recreational Off-Road Riding

    Some riders use off-road motorcycles for recreation on private tracks, approved riding areas, or designated trails. The intensity and terrain can vary considerably.

    Protective footwear should be selected according to the actual riding conditions rather than assuming that casual or occasional riding requires less attention to safety. Even at modest speeds, a foot can encounter a motorcycle, the ground, or an obstacle unexpectedly.

    A motocross boot may be appropriate for some recreational uses, provided its design, fit, and certification align with the intended activity.

    Riders should also follow local requirements regarding protective equipment and where off-road motorcycles may legally be operated.

    4. Practice and Training Sessions

    Structured riding lessons and practice sessions often involve repeating basic techniques, including body positioning, braking, shifting, and standing on the footpegs.

    Suitable boots can help riders become familiar with their motorcycle’s controls while providing a consistent footwear setup. However, a new rider may need time to adapt to the stiffness and bulk of motocross footwear.

    Before beginning a demanding session, practice operating the gear lever and rear brake in a controlled environment. If the boots make the controls difficult to use, have the fit and compatibility assessed rather than trying to compensate with unsafe movements.

    A qualified instructor can help riders understand how footwear interacts with riding technique.

    5. Off-Road Powersports Activities

    The product title references off-road powersports, a broad category that can include different vehicle types and riding environments. Not every item of motorcycle protective equipment is appropriate for every powersports activity.

    Before using motocross boots with a particular vehicle, verify that the footwear is suitable for its control layout, riding position, and exposure risks. Equipment designed for a motorcycle may not be the best match for a vehicle with different foot-control arrangements or protection requirements.

    Follow the vehicle manufacturer’s guidance and any applicable event or facility rules.

    6. Transporting and Storing Riding Equipment

    After riding, boots often carry dust, mud, and moisture into a vehicle or storage area. A consistent cleaning and storage routine can help maintain the footwear and make it easier to inspect.

    Remove loose dirt using an appropriate brush and follow the manufacturer’s cleaning instructions. Allow the boots to dry in a ventilated location away from direct heat sources that could damage materials or adhesives.

    Store them in a way that does not place unnecessary pressure on buckles or deform the boot structure. Avoid leaving wet boots sealed in a bag for extended periods.

    Regular care can help identify wear early, but cleaning does not restore protective components that have been damaged by an impact or prolonged use.

    Who May Find the Alpinestars Tech 3 Boots Suitable?

    Motocross Riders

    Riders who regularly use motocross tracks may be interested in a boot specifically designed for that environment. The Tech 3 model is marketed for off-road riding, so its intended category aligns with the needs of many motocross users.

    The correct choice still depends on fit, riding intensity, certification, and personal preferences regarding stiffness and mobility.

    Trail and Recreational Off-Road Riders

    People who ride on dirt trails or other approved off-road routes may consider motocross footwear when they want more structured coverage than ordinary shoes can provide.

    The amount of walking, the terrain, and the motorcycle’s control layout should be considered before choosing a motocross-specific design.

    Riders Building a Protective Gear Setup

    Someone assembling a complete riding kit may be evaluating boots alongside a helmet, gloves, eye protection, and appropriate clothing. A dedicated motocross boot can be one component of that setup.

    It is important to consider how the boots work with riding pants and other protective equipment. The boot shaft should remain positioned as intended, and the combination should not create uncomfortable pressure or leave unnecessary gaps in coverage.

    Riders Who Prefer a Structured Boot

    Some riders prefer the supportive feel and protective construction associated with motocross footwear. Others may prefer more flexible boots for walking or mixed road-and-trail use.

    Personal preference should be balanced with the requirements of the activity. The right boot is one that fits properly, suits the intended riding environment, and allows safe control operation.

    Riders Considering a Size 6

    The supplied product title identifies size 6, but the applicable sizing system should be confirmed. Motorcycle footwear may use different sizing conventions depending on the product listing and market.

    A size label alone cannot guarantee a suitable fit. Riders should consult the manufacturer’s sizing chart, measure their feet according to its instructions, and account for the socks worn during riding.

    If the boots are intended as a gift, confirm the recipient’s size system and fit preferences rather than relying solely on their usual casual-shoe size.

    Important Things to Consider Before Choosing the Boots

    1. Confirm the Size System and Fit

    Sizing is one of the most important considerations when selecting motorcycle boots. The product title identifies a size 6, but buyers should verify whether the listing uses US, UK, or another sizing convention.

    Foot length is only one factor. Foot width, instep height, calf shape, sock thickness, and the way the boot closes can all influence fit.

    Follow the manufacturer’s measurement guidance and try the boots with the socks normally used for riding, where possible. Check that the toes have appropriate room, the heel remains secure, and the closures can be adjusted without excessive pressure.

    A boot that causes pain, numbness, or restricted control operation should not be treated as properly fitted simply because its labelled size matches the rider’s usual footwear.

    2. Verify the Exact Model and Certification

    Protective equipment can change between model years or product versions. Before purchasing, check the exact model name, version, and any stated certification information.

    If CE certification is important, consult the boot’s product label and manufacturer documentation. Look for the applicable standard, certification details, and any information about protection levels.

    Avoid assuming that every boot in the same product family carries identical certification or performance characteristics. The product title is a useful starting point, but it should not replace the technical documentation.

    3. Understand the Limits of Protective Footwear

    Motocross boots can help provide protection against certain impacts, abrasion, and contact hazards, but they cannot prevent every injury.

    The forces involved in a crash can exceed the protection a boot is designed to provide. Injury risk also depends on speed, terrain, motorcycle weight, the nature of the fall, and other circumstances.

    Protective footwear should be used as part of a broader safety approach that includes suitable riding technique, a well-maintained motorcycle, appropriate protective equipment, and adherence to track or trail rules.

    4. Consider Stiffness and Mobility

    Protective motocross boots may feel stiffer than ordinary shoes. This can be part of their structured design, but the degree of stiffness influences how easily a rider moves their ankles and operates controls.

    Some riders adapt quickly, while others may need time to become comfortable with the feel of a new boot. Do not assume that a boot is unsuitable merely because it feels different from casual footwear, but do not ignore pain or unsafe control operation.

    Practice in a controlled setting before using unfamiliar boots on difficult terrain.

    5. Check Compatibility With the Motorcycle

    Boot height, toe shape, sole thickness, and overall bulk can affect how easily a rider reaches and operates foot controls.

    Before a ride, check that the boots work with the motorcycle’s gear lever, rear brake, footpegs, and riding position. If the boot catches on a control or makes it difficult to operate it accurately, address the issue before riding.

    The motorcycle’s control layout and any aftermarket modifications may affect compatibility.

    6. Inspect Buckles, Soles, and Protective Components

    Boots are exposed to repeated stress during off-road use. Buckles can become damaged, straps may wear, and soles can deteriorate from contact with footpegs or the ground.

    Inspect the boots before each ride, especially after a fall or hard impact. Look for loose or missing fasteners, cracks, torn materials, sole separation, and changes in the way the boot fits.

    If a protective component is visibly damaged, seek guidance from the manufacturer or a qualified service provider. Do not assume that a boot remains protective simply because the exterior still looks presentable.

    7. Account for Weather and Terrain

    Mud, water, dust, and temperature can affect comfort and maintenance needs. A boot suitable for dry track riding may feel different during a wet trail outing.

    Check the manufacturer’s care guidance and avoid assuming that a particular model is waterproof unless that feature is explicitly documented.

    After wet or muddy use, clean the boots appropriately and allow them to dry thoroughly. Avoid placing them directly beside a heater or using excessive heat, which can damage materials or adhesives.

    8. Consider Walking Comfort

    Motocross boots are designed primarily for riding, not long-distance walking. Their stiff soles and protective structure may make extended walks less comfortable than footwear designed for hiking or everyday use.

    Riders who frequently need to walk long distances on trails may want to compare motocross boots with enduro or adventure-oriented designs. The appropriate choice depends on how much walking is involved and what type of protection is required.

    9. Review Care and Storage Requirements

    Follow the manufacturer’s instructions for cleaning, drying, and storage. Use only cleaning products suitable for the materials, and avoid solvents or treatments that could damage the boot’s surface or components.

    Store the boots away from prolonged heat and direct sunlight. Keep the buckles and straps in good condition and avoid stacking heavy equipment on top of them.

    Good maintenance can help extend usable life, but it cannot reverse structural damage or restore a boot that has reached the end of its service life.

    Comparing General Categories of Motorcycle Footwear

    Motorcycle footwear is designed for different riding environments. Understanding these categories can help riders choose a style that suits their priorities.

    Motocross Boots

    Motocross boots generally emphasize structured protection for off-road riding, including coverage around the lower leg and foot. They are often designed for repeated footpeg contact, movement on uneven ground, and exposure to dirt and debris.

    The Alpinestars Tech 3 belongs to this category. Its suitability depends on the exact version, fit, and intended use.

    The main trade-off is that the protective structure may make the boots stiffer and less comfortable for extended walking than some other footwear types.

    Enduro Boots

    Enduro boots are also intended for off-road riding, but designs can differ in their balance of support, flexibility, traction, and walking comfort.

    Some riders who spend substantial time moving around their motorcycles or navigating technical trails may prefer an enduro-oriented design. Others may prioritize the feel and structure of a motocross boot.

    The categories overlap, so the exact specifications matter more than the label alone.

    Adventure Motorcycle Boots

    Adventure boots are generally designed for mixed riding that may include paved roads, gravel, and light or moderate off-road use. Depending on the model, they may emphasize walking comfort and versatility alongside protection.

    A boot intended for adventure touring may not provide the same design characteristics as a dedicated motocross boot. Riders should compare the intended use, construction, and certification rather than assuming that all motorcycle boots are interchangeable.

    Road Motorcycle Boots

    Road-oriented motorcycle boots are designed for street riding and may emphasize abrasion resistance, ankle protection, shift-area reinforcement, and compatibility with a seated road-riding position.

    Their design can differ significantly from motocross footwear. A road boot may not offer the same height, sole design, or structure expected for demanding off-road use.

    The appropriate choice depends on where and how the motorcycle will be ridden.

    Casual Motorcycle Shoes

    Motorcycle shoes often provide a more familiar walking feel and may be convenient for commuting or everyday activities. Some incorporate protective features intended for street use.

    However, their lower profile and different construction can make them less suitable for motocross conditions. Casual riding shoes should not be treated as equivalent to purpose-built off-road boots.

    These categories serve different needs. Riders should choose footwear according to the activity, the protection required, fit, and the manufacturer’s intended-use guidance.

    Frequently Asked Questions

    What are the Alpinestars Tech 3 boots designed for?

    The Tech 3 boots are marketed for motocross and off-road powersports. Their intended category is specialized riding footwear rather than ordinary casual shoes. Confirm the exact model specifications to understand the supported uses and protective features.

    Are the boots CE-certified?

    The supplied product title describes them as CE-certified. Buyers should verify the exact certification information on the product label and in the manufacturer’s documentation, including the applicable standard and any stated protection levels.

    Are the Tech 3 boots lightweight?

    The product title describes the boots as lightweight. Actual weight can vary by size and version, and the effect of that weight on comfort depends on fit, construction, and personal preference. Consult official specifications if exact weight is important.

    What does size 6 mean?

    The listing identifies size 6, but the sizing system should be confirmed. Check whether it uses US, UK, or another convention and consult the manufacturer’s sizing chart before selecting a size.

    Can the boots be used for trail riding?

    Motocross boots may be suitable for many off-road trail activities, provided their design and certification match the intended use. Riders should consider the terrain, the amount of walking involved, and compatibility with the motorcycle’s controls.

    Are motocross boots comfortable for walking?

    They are designed primarily for riding and may feel stiffer than ordinary shoes or hiking boots. Walking comfort varies by model, fit, and personal preference. Riders who regularly walk long distances may wish to compare other off-road footwear categories.

    Are the boots waterproof?

    The supplied product title does not establish waterproof performance. Check the manufacturer’s specifications for any water-resistance or waterproof claims. Do not assume that motocross boots are fully waterproof simply because they are intended for off-road use.

    How should the boots be cleaned?

    Follow the manufacturer’s care instructions. Remove dirt using suitable cleaning methods, allow the boots to dry in a ventilated area, and avoid excessive heat or cleaning products that could damage the materials.

    How can a rider tell whether the boots fit properly?

    The boots should remain secure without causing painful pressure, numbness, or excessive movement. Check the toe room, heel retention, calf fit, closure adjustment, and ability to operate the motorcycle’s controls. Use the manufacturer’s sizing guidance and try the boots with normal riding socks where possible.

    Do motocross boots prevent injuries?

    No protective boot can eliminate the risk of injury. Motocross boots are designed to provide protection against certain hazards, but outcomes depend on the crash, forces involved, fit, condition, and other factors. They should be part of a complete protective setup.

    Can the boots be used for road riding?

    The suitability of a motocross boot for road use depends on its certification, design, and the rider’s requirements. Dedicated road boots may offer features better suited to street riding. Check the manufacturer’s intended-use guidance and any local requirements.

    When should motocross boots be replaced?

    Replacement may be necessary when the boots show significant wear, structural damage, broken closures, sole separation, or damage from a substantial impact. Follow the manufacturer’s guidance and seek advice if the condition of a protective component is uncertain.

    Conclusion

    The Alpinestars Tech 3 Motocross Boots are designed for riders looking for specialized footwear for motocross and off-road powersports. The referenced version is described as durable, lightweight, CE-certified, and finished in black and white, with the listing specifying size 6.

    Motocross boots differ from casual shoes because they are designed around the demands of riding, including footpeg contact, uneven terrain, and potential impacts. Their structured construction may provide useful coverage and support, while the sole, closure system, and fit influence how the boots work with the motorcycle.

    The most important factors are not appearance or a single advertised feature. Proper sizing, verified certification, compatibility with the motorcycle’s controls, suitable construction, and good condition all contribute to the usefulness of protective footwear.

    Before choosing the Tech 3 model, confirm the sizing system, exact version, certification documentation, and manufacturer’s care instructions. Consider whether motocross footwear matches the terrain and the amount of walking involved in typical rides. Inspect the boots regularly, maintain their closures and soles, and replace them when damage compromises their condition.

    For riders whose activities align with the product’s intended off-road category, the Tech 3 may be a model worth examining as part of a broader riding gear setup.

    You can check more details on Amazon here

    As an Amazon Associate, we earn from qualifying purchases.
  • TechKen VR Charging Dock for Meta Quest 3S, Quest 3, and Quest 2: Features, Setup, and Buying Considerations

    TechKen VR Charging Dock for Meta Quest 3S, Quest 3, and Quest 2: Features, Setup, and Buying Considerations

    Introduction

    Virtual reality headsets have become a popular way to experience immersive games, interactive fitness sessions, virtual environments, and social applications. Devices such as the Meta Quest 3S, Meta Quest 3, and Meta Quest 2 allow users to explore VR without relying on a traditional gaming computer for every experience. However, keeping a VR setup organized involves more than storing the headset itself. Controllers, charging cables, optional head straps, and other accessories can quickly occupy desk space or end up scattered around a room.

    A dedicated charging station can help bring these components together in one location. Instead of leaving a headset on a table and charging its accessories separately, users may prefer a vertical stand that provides a designated place for their equipment between sessions.

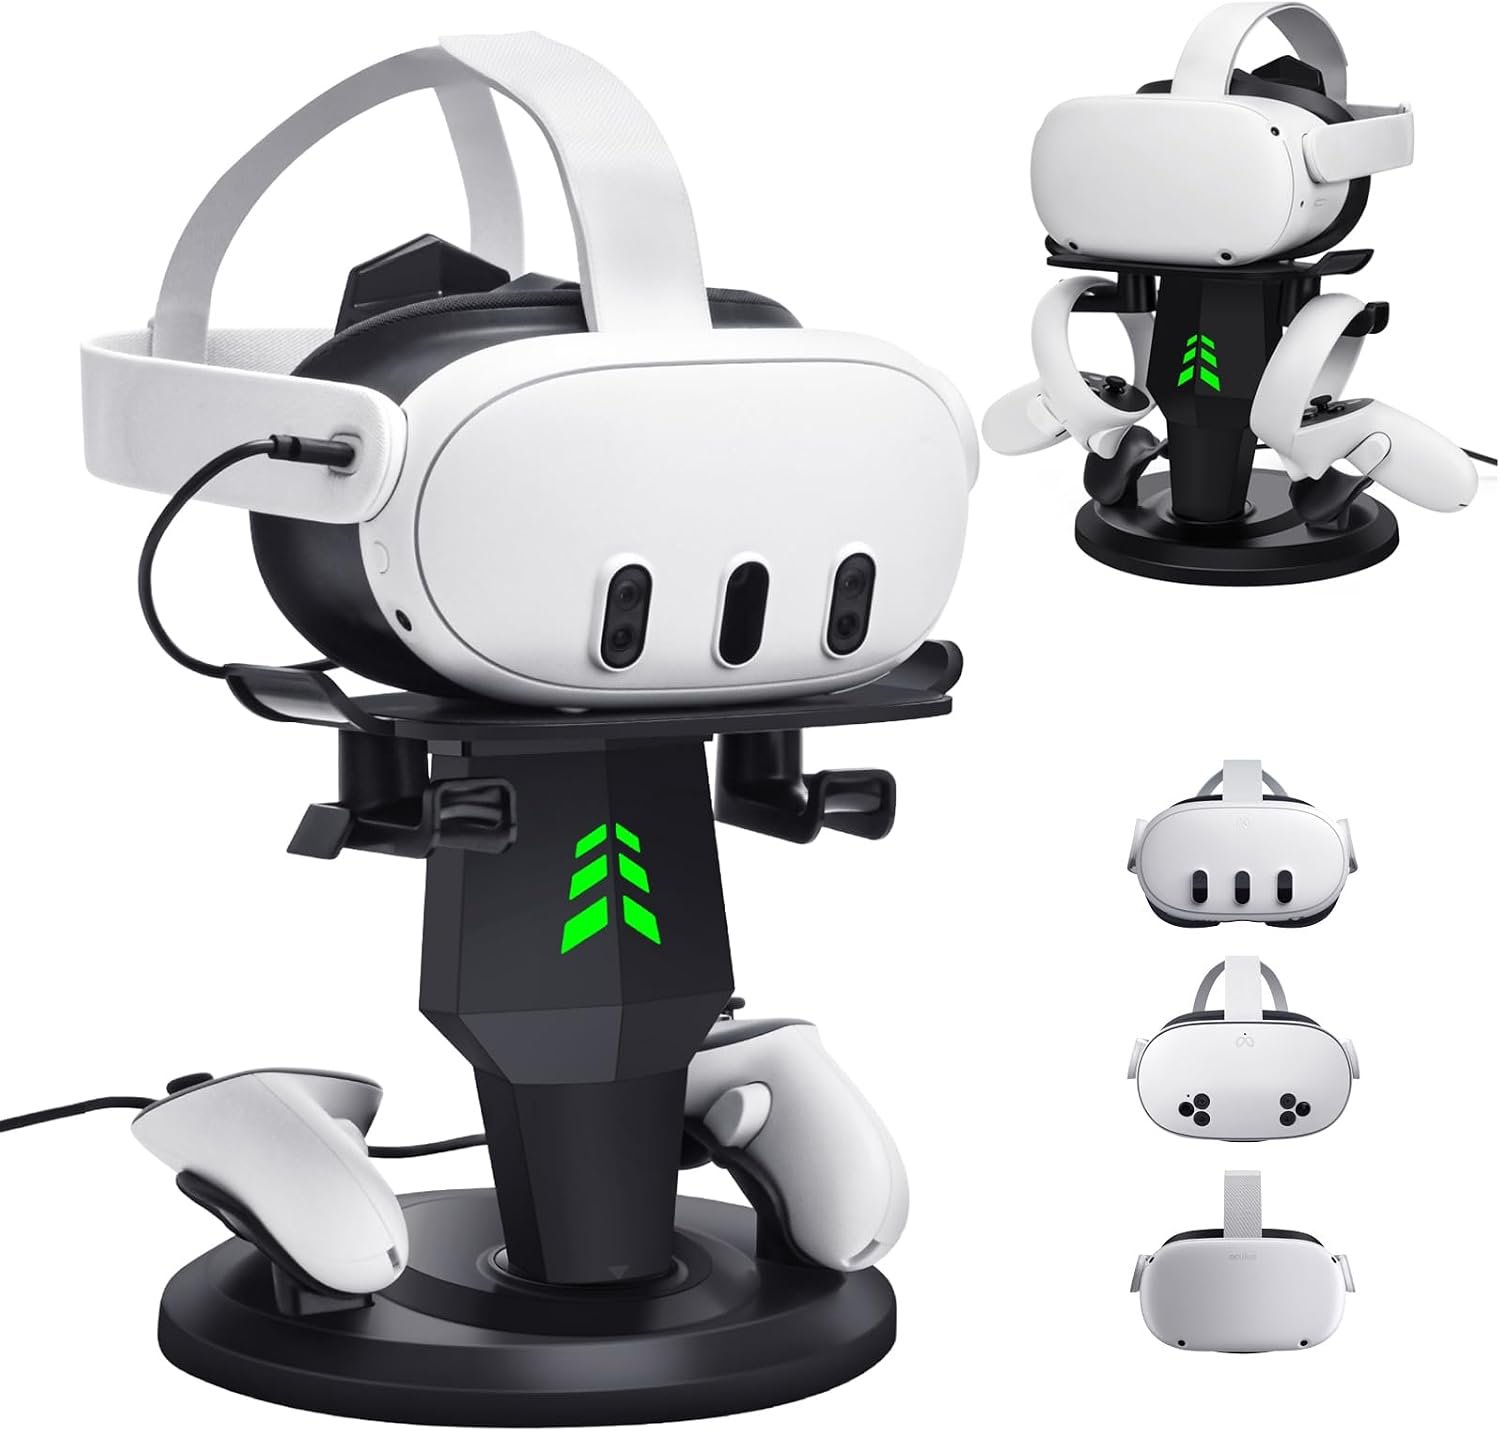
    The TechKen VR Charging Dock for Meta Quest 3S, Quest 3, and Quest 2 is designed around this idea. Its product description identifies it as a vertical VR stand and charging station intended for compatible Meta Quest headsets. The listing also highlights a Type-C cable, fast-charging functionality, and support for controllers with grip covers and Elite-style straps.

    These features may appeal to VR players who use their headsets regularly and want a more organized way to store and charge their equipment. At the same time, compatibility, charging requirements, accessory dimensions, and the space available on a desk are important considerations before choosing a charging dock.

    This guide explores the advertised features of the TechKen VR charging dock, practical ways to incorporate it into a VR setup, the differences between common storage and charging solutions, and the limitations worth understanding before making a decision.

    What Is the TechKen VR Charging Dock?

    The TechKen VR charging dock is a charging and storage accessory designed for selected Meta Quest virtual reality headsets. According to the product title, it supports the Quest 3S, Quest 3, and Quest 2 and combines a vertical stand with charging functionality.

    A charging dock generally provides a designated location for compatible electronics while supplying power through a supported charging connection. In a VR setup, this can help keep the headset and controllers together when they are not in use.

    The TechKen model is also advertised as accommodating controllers with grip covers and Elite-style straps. This detail may matter to users who have modified their VR equipment for comfort, stability, or a different gaming experience. However, the fit of a particular accessory combination should be verified against the current product listing and any supplied compatibility information.

    The product title mentions a Type-C cable and fast charging. Those terms describe intended features, but they do not establish a specific charging speed or guarantee compatibility with every power adapter. Actual charging performance depends on the dock’s electrical design, the connected power source, the headset’s charging requirements, and any restrictions described by the manufacturer.

    A charging station is also different from a battery replacement or a device that increases the headset’s internal battery capacity. Its primary role is to provide a convenient place to store and charge supported equipment.

    Before selecting the TechKen dock, it is sensible to check the exact items included in the package, the required power supply, the supported headset configurations, and the installation instructions.

    Key Features of the TechKen VR Charging Dock

    1. Compatibility With Multiple Meta Quest Headsets

    The product title lists compatibility with three headset models: Meta Quest 3S, Meta Quest 3, and Meta Quest 2.

    Supporting several headset generations can be useful for households where different people own different Quest devices. It may also be relevant to users who upgrade their headset but want to retain a charging accessory, provided the new device remains within the dock’s documented compatibility range.

    However, compatibility should not be interpreted as proof that every configuration fits identically. Headsets can differ in their dimensions, charging-port placement, facial interfaces, and optional accessories.

    Before using the dock, confirm the manufacturer’s instructions for the exact headset model. Check whether any required connector, adapter, or positioning step differs between the Quest 3S, Quest 3, and Quest 2.

    Users who own a third-party head strap, protective shell, facial interface, or battery accessory should pay particular attention to the supported configuration. An accessory that changes the headset’s shape may affect how securely it sits on a stand.

    2. Vertical Storage Design

    The TechKen dock is described as a vertical VR stand. A vertical arrangement can help consolidate equipment within a defined footprint, rather than spreading a headset and its accessories across a desk.

    For a home gaming area, this can make the VR setup easier to identify and put away after use. It may also help keep the headset away from loose objects, books, and other items that could press against its lenses or straps.

    A vertical stand is not automatically more space-efficient in every room. Its overall height, base dimensions, and stability matter, particularly when it is placed near a monitor, keyboard, or other frequently used equipment.

    Users should select a flat, stable surface and leave enough clearance to place and remove the headset without hitting nearby objects. The stand should not be positioned where someone could easily knock it over while walking past.

    3. Charging Station Functionality

    A charging station combines storage with a way to supply power to compatible equipment. The TechKen product is advertised as a VR charging dock rather than a stand intended only for display.

    The practical advantage of this arrangement is convenience. Users can keep their headset in a consistent location and connect it to charging when a session ends, reducing the need to search for cables or move equipment around the room.

    The exact charging arrangement matters, however. Some docks use a direct connector, while others rely on a separate cable or accessory. The product’s current documentation should explain how the TechKen dock connects to the headset and which parts must be aligned during placement.

    Users should not force a charging connector into a port or assume that a headset is charging merely because it is resting on the stand. Confirm the connection and check the headset’s charging indicator or other manufacturer-provided status information.

    4. Type-C Cable

    The product title identifies a Type-C cable as part of the charging arrangement. USB Type-C is a connector standard used by many modern electronic devices, including compatible VR headsets and accessories.

    The presence of a Type-C cable does not, by itself, specify the charging power delivered to the headset. Cable capability, connector arrangement, the dock’s internal electronics, and the power adapter all influence the charging process.

    It is also important to distinguish the shape of a connector from the capabilities of the equipment connected to it. Not every USB-C cable supports the same data rates or power levels, and not every USB-C accessory works with every device.

    Check whether the supplied cable is intended for the dock’s power input, the headset connection, or another part of the system. Follow the manufacturer’s wiring diagram rather than substituting an arbitrary cable arrangement.

    5. Advertised Fast-Charging Support

    The TechKen product title describes the station as supporting fast charging. This may be relevant to users who want their headset ready for another session without leaving it connected for longer than necessary.

    However, charging speed is determined by the complete charging system, not by a marketing term alone. The power adapter, cable, dock circuitry, headset charging system, battery temperature, and current battery level can all influence the time required.

    The headset may also regulate charging as part of its normal battery-management process. As a result, charging performance may vary between models and usage conditions.

    Prospective users should look for specific charging specifications in the product documentation. If the listing does not provide a clear power rating or measured charging time, it is better not to assume a particular number of watts or a guaranteed charging duration.

    For everyday use, the main consideration is whether the dock provides a compatible and convenient charging method that meets the manufacturer’s requirements for the headset.

    6. Support for Controllers With Grip Covers

    Many VR users add grip covers or controller straps to improve handling. These accessories can change the controllers’ dimensions and may influence whether they fit in a charging or storage cradle.

    The TechKen dock is advertised as supporting controllers with grip covers. This feature may be useful for players who prefer additional grip material or a more secure hold during active games.

    Nevertheless, grip covers vary in thickness, shape, and placement. A dock that accommodates one style may not necessarily fit every third-party cover.

    Check the product photographs, listed compatibility details, and any restrictions on controller accessories. If the manufacturer identifies supported dimensions or specific accessory types, use those details to assess whether a particular setup is likely to fit.

    Avoid pressing a controller into a cradle if the grip cover causes resistance. A poor fit can make storage less convenient and may place unnecessary pressure on the controller or dock.

    7. Compatibility With Elite-Style Head Straps

    The product title also mentions support for Elite straps. Head straps can affect how a headset sits on a stand because they may add bulk, extend behind the head, or incorporate a battery compartment.

    For users who have upgraded their headset’s head strap, compatibility can be more important than it is for someone using the original configuration. A stand that accommodates the headset alone may not leave enough clearance for an aftermarket strap.

    The TechKen dock is advertised for configurations involving Elite-style straps, but the exact supported products and dimensions should be verified. Not every strap sold under a similar description has the same shape.

    Before placing a headset on the dock, make sure the strap does not interfere with the charging connection or cause the headset to rest at an unstable angle. If the strap contains an additional battery, confirm whether that accessory has a separate charging requirement.

    8. A More Organized VR Setup

    Beyond charging, a dedicated station can provide a consistent place for the headset and controllers. This can help users maintain a tidier desk and reduce the likelihood of accessories being misplaced between sessions.

    A predictable storage routine can also make it easier to notice when a controller, cable, or other component has been left somewhere else. In a shared household, a designated location may help everyone return the equipment to the same place.

    Organization alone does not protect a headset from every type of damage. Users should still avoid direct sunlight on the lenses, excessive heat, moisture, and situations in which equipment can be knocked off the stand.

    The charging station should be viewed as one component of a broader storage routine rather than a replacement for the headset manufacturer’s care recommendations.

    How the TechKen VR Charging Dock Can Be Used

    1. Creating a Dedicated VR Charging Area

    One straightforward use is to establish a permanent place for the headset and controllers. The dock can be positioned on a desk, shelf, or gaming station where the equipment is accessible but not in the way of everyday activities.

    Choose a surface that is level and stable. Leave sufficient room around the dock so the headset can be placed on it without touching a monitor, wall, or other equipment.

    Cable routing is also worth considering. A cable that crosses a walking path or hangs over the edge of a desk can create a tripping or snagging risk. Keep cables arranged so they do not pull on the dock or charging connector.

    If the station is placed near a computer, make sure it does not block ventilation openings or interfere with other equipment.

    2. Preparing for the Next VR Session

    A charging dock can be incorporated into a simple routine after gaming. When a session ends, users can return the headset and controllers to their designated locations and connect the equipment according to the manufacturer’s instructions.

    The benefit is consistency rather than a guaranteed increase in battery performance. A regular routine may make it easier to see which components need charging and which are ready for use.

    Before starting a new session, check the headset’s battery indicator and confirm that the controllers have adequate power. The dock should not be assumed to charge every component automatically unless the manufacturer explicitly documents that function.

    Users should also allow equipment to cool as recommended if it has become unusually warm during use. Do not cover the headset or its ventilation openings while charging.

    3. Organizing a Shared Family VR Setup

    In households where several people use the same VR system, equipment can become scattered between rooms or gaming areas. A shared charging location may help keep the headset, controllers, and accessories together.

    This can be particularly useful when users take turns playing games or using fitness applications. Everyone can return the equipment to the same place rather than leaving it on a sofa or floor.

    A shared station should be placed away from areas where children or pets may pull on cables or knock over the stand. Users should also avoid leaving small accessories where young children could access them.

    If the household owns more than one headset, confirm whether the dock is compatible with each device before assuming it can serve as a universal charging station.

    4. Supporting a VR Gaming Desk

    A dedicated gaming desk may include a computer, monitor, keyboard, headphones, controllers, and charging cables. A vertical VR stand can help give the headset a defined place within that arrangement.

    When planning the layout, consider the dock’s height and base dimensions as well as the space needed to remove the headset. Placing the stand too close to a monitor or desk edge may make it awkward to use.

    Cable management can also help preserve the workspace. Secure excess cable length without bending connectors sharply or creating tension around the charging port.

    The dock should remain stable during normal handling. If the desk moves or vibrates frequently, choose a position where the stand is unlikely to slide or tip.

    5. Accommodating Compatible Grip Covers

    Users who have added grip covers can use the dock according to the supported configuration stated by the manufacturer. The aim is to store the controllers without removing accessories every time the headset is put away.

    Before regular use, check that each controller rests securely in its intended position. A grip cover should not block a charging contact or interfere with a connection if the dock uses one.

    If the controller does not fit comfortably, do not force it into place. Review the compatibility details and determine whether the cover needs to be removed or whether a different storage arrangement is required.

    6. Storing a Headset With an Elite-Style Strap

    For users with an upgraded head strap, the dock may provide a convenient place to store the headset between sessions, provided the specific strap configuration is supported.

    Check that the strap does not push against nearby surfaces or make the headset lean. If the strap includes a battery or another electronic component, review its separate charging and storage instructions.

    Some third-party straps have adjustment mechanisms or rigid components that change the overall shape of the headset. A secure fit should not require bending the strap or placing pressure on the headset’s facial interface.

    7. Using the Dock in a Small Room

    A vertical stand may help consolidate VR equipment in a compact gaming area. However, small spaces often have less room for safe cable routing and stable placement.

    Measure the available surface before setting up the station. Consider the space required to lift the headset off the stand and return it without hitting a wall or another object.

    Avoid placing the dock on a narrow ledge or an unstable stack of books. A smaller footprint is useful only if the equipment remains secure and accessible.

    Who May Find the TechKen VR Charging Dock Suitable?

    Meta Quest 3S Owners

    Quest 3S users who want a designated charging and storage location may find the dock relevant because the product title explicitly lists this headset model. Compatibility should still be confirmed against the current product instructions and any attached accessories.

    Meta Quest 3 Owners

    Quest 3 users may appreciate having the headset and compatible controllers organized together. Those who have installed a third-party head strap or controller grips should check whether the exact configuration fits the dock.

    Meta Quest 2 Owners

    For Quest 2 owners who continue to use their headset, a compatible charging station can provide a dedicated storage location without requiring a different headset. Verify the precise connection method and any model-specific instructions before use.

    Frequent VR Gamers

    People who play VR games regularly may value a predictable place to return their equipment after each session. A dock can reduce clutter and make charging part of a consistent routine.

    Its usefulness depends on the user’s habits. Someone who stores a headset in a protective case after every session may prefer a different organization method.

    Users With Aftermarket Accessories

    Players who use grip covers or Elite-style straps may be interested in the TechKen model because these accessories are specifically mentioned in the product title. Still, accessory designs vary, so compatibility should be checked for the exact products being used.

    Families and Shared Gaming Spaces

    A common charging location may help several users keep track of the same headset and controllers. A stable setup with carefully routed cables can also reduce clutter in a shared room.

    The dock should be placed where users can access it safely without creating a hazard for children, pets, or people walking through the area.

    Important Things to Consider Before Choosing the Dock

    1. Confirm the Exact Headset Compatibility

    Although the product title lists the Quest 3S, Quest 3, and Quest 2, the manufacturer’s documentation should be checked for the exact model and supported configuration.

    Compatibility may depend on the headset version, charging-port arrangement, required cable, or any adapter included in the package. Do not assume that a dock designed for one Quest model will work with every VR headset.

    2. Check the Power Requirements

    Charging speed and compatibility depend on the complete power arrangement. Review the required input voltage, current, supported power adapter, and cable configuration before connecting the station.

    Do not assume that the word “fast” guarantees a particular charging rate. If a specific charging speed is important, look for documented electrical specifications rather than relying only on promotional wording.

    Use a suitable power source and avoid damaged cables, loose connectors, or adapters that do not meet the manufacturer’s requirements.

    3. Understand What Is Included

    Product photographs may show a headset, controllers, straps, cables, or other accessories for demonstration. Not every item shown in an image is necessarily included with the charging dock.

    Read the package contents in the current listing. Confirm whether the power adapter, Type-C cable, controller accessories, or other components must be supplied separately.

    This helps prevent confusion during setup and makes it easier to determine whether the dock fits into an existing charging arrangement.

    4. Verify the Fit of Aftermarket Accessories

    Grip covers and Elite-style straps differ between manufacturers and models. A dock may support certain accessory configurations without accommodating every variation.

    If the headset has a rigid protective shell, an extended battery strap, or an unusual controller cover, check the dimensions and compatibility details carefully.

    Never force the headset or controllers into a position that causes resistance, instability, or pressure on sensitive components.

    5. Consider Stability and Placement

    A vertical stand needs a stable surface. Place the dock away from desk edges, narrow shelves, and locations where a cable could pull it over.

    Think about the movement required to place and remove the headset. A dock that is difficult to access may be less convenient in everyday use, even if it provides a compact storage arrangement.

    If several people share the same room, choose a location that reduces the risk of accidental bumps.

    6. Protect the Headset Lenses

    VR headset lenses require care. Direct sunlight entering the lenses can concentrate light and potentially damage the display, even if the headset is not being used.

    A charging dock should be positioned away from windows or other locations where sunlight may shine directly into the headset. The stand does not necessarily shield the lenses from ambient light.

    Follow Meta’s storage guidance, and consider a lens cover if appropriate for the headset and recommended by its manufacturer. Avoid placing anything against the lenses that could scratch them.

    7. Manage Heat and Ventilation

    Electronic devices can become warm during use and charging. Follow the headset and dock manufacturers’ instructions regarding operating temperature and ventilation.

    Do not cover the headset with fabric while charging, place the dock next to a heat source, or use it in a location with poor airflow if the instructions prohibit such conditions.

    If the headset, cable, power adapter, or dock becomes unusually hot, disconnect power when it is safe to do so and consult the relevant manufacturer’s support guidance.

    8. Avoid Assuming That Every Component Charges Automatically

    A charging station may support the headset and provide storage for controllers, but those functions are not always identical. Some docks charge only particular components, while others use separate connections for different devices.

    Verify which components the TechKen dock actually charges and how the controllers must be connected, if controller charging is supported. The product title alone should not be treated as confirmation of every possible charging function.

    9. Review Warranty and Support Information

    Accessories can differ in warranty coverage, return terms, and technical support. Check the current seller and manufacturer information if warranty support is important.

    Retain the documentation and any necessary purchase information. If the dock does not connect as described, avoid modifying its electronics or using improvised connectors that could damage the headset.

    Comparing General Categories of VR Storage and Charging Accessories

    Different VR accessories serve different purposes. Understanding the categories can help determine whether a charging dock fits an existing setup.

    Basic VR Stands

    A basic VR stand provides a designated place to store a headset and possibly its controllers. It may help reduce clutter and keep equipment off a desk or floor.

    Its main distinction is that storage may be the primary function. Charging can still be handled separately using the headset’s normal cable and power adapter.

    A basic stand may suit users who already have a preferred charging arrangement or who prioritize simple storage over combining functions.

    Dedicated Charging Docks

    A charging dock combines a storage position with a charging connection for compatible equipment. This can reduce the number of separate steps required to store and recharge a device.

    The TechKen station belongs to this general category based on its advertised charging and vertical stand functions. Its suitability depends on the exact headset model, power requirements, and accessory configuration.

    Charging docks can differ in the number of devices supported, connection design, electrical specifications, and whether accessories must be removed before use.

    Wall-Mounted Storage Solutions

    Wall-mounted VR holders use wall space rather than a desk or shelf. They may help free up a work surface, but installation requires a suitable mounting location and hardware.

    A wall holder is not necessarily a charging station. Some designs provide storage only, while others incorporate cable management or charging features.

    Users should consider the wall material, mounting instructions, cable routing, and the need to protect the headset from direct sunlight or accidental contact.

    Protective Cases

    Protective cases are intended to shield VR equipment during storage or transport. They may be useful for people who travel with their headset or prefer to store it away from dust and incidental contact.

    A case typically requires the equipment to be removed and packed, and it may not provide convenient charging while the headset is stored. Users should follow the case and headset manufacturers’ recommendations to avoid trapped heat or improper storage.

    A charging dock and a protective case therefore serve different purposes and may complement each other, depending on how the headset is used.

    Multi-Accessory Charging Stations

    Some charging stations are designed to organize several devices or accessories in one location. Their supported devices, connectors, and charging methods can vary widely.

    The key consideration is whether the station is designed for the specific headset and controllers rather than whether it simply has several charging ports. Compatibility, power delivery, physical fit, and safe cable routing should all be checked.

    These categories are not direct substitutes in every situation. A charging dock may be useful for daily storage, while a protective case may be more appropriate for transport.

    Frequently Asked Questions

    Which Meta Quest headsets does the TechKen charging dock support?

    The product title lists Meta Quest 3S, Meta Quest 3, and Meta Quest 2. Check the current listing and manufacturer’s instructions for exact compatibility details, especially if the headset uses third-party accessories.

    Does the dock include a Type-C cable?

    The product title mentions a Type-C cable. Review the current package contents to confirm the included cable’s purpose and whether a power adapter or other components must be supplied separately.

    Does the TechKen dock support fast charging?

    The product is advertised as supporting fast charging. Actual charging performance depends on the dock’s specifications, power source, cable, headset, and operating conditions. Consult the documentation for supported power requirements and any stated charging rates.

    Can the dock accommodate controller grip covers?

    The product title specifically mentions support for controllers with grip covers. However, grip covers differ in shape and thickness, so check compatibility with the exact covers being used.

    Can it be used with an Elite-style head strap?

    Elite-style strap compatibility is advertised, but not every strap has the same dimensions or design. Confirm the supported configuration and ensure that the strap does not interfere with the headset’s stability or charging connection.

    Does the dock charge the controllers as well as the headset?

    The product title describes a charging station and mentions controller support, but storage compatibility does not necessarily mean that controllers are charged by the dock. Check the current listing and manual to determine exactly which components receive power and how they connect.

    Can the dock be used while the headset is not in use?

    A charging dock is generally intended to hold and charge compatible equipment between sessions. Follow the manufacturer’s instructions for the correct placement, connection, and charging procedure.

    Is the dock suitable for a small gaming desk?

    A vertical design may help consolidate equipment, but suitability depends on the dock’s footprint, height, cable arrangement, and the space needed to remove the headset. Measure the available surface and ensure the stand can sit securely.

    Does the charging dock increase the headset’s battery capacity?

    No. A charging dock provides a way to recharge compatible equipment; it does not inherently increase the headset’s built-in battery capacity. Any battery expansion would require a separate compatible accessory designed for that purpose.

    Can any USB-C power adapter be used with the dock?

    Do not assume that every adapter is suitable. Check the manufacturer’s specified input requirements and use a compatible power source. Connector shape alone does not establish that an adapter provides the correct electrical output.

    How should the dock be cleaned?

    Follow the manufacturer’s cleaning instructions. Disconnect power before cleaning when instructed, avoid introducing liquid into electronic components, and allow parts to dry as specified before reconnecting them.

    Does the dock protect the headset lenses from sunlight?

    A vertical stand does not necessarily protect the lenses from sunlight. Store the headset away from direct sunlight and follow Meta’s care instructions to reduce the risk of lens or display damage.

    Conclusion

    The TechKen VR Charging Dock for Meta Quest 3S, Quest 3, and Quest 2 is designed to combine vertical storage with charging convenience. Its advertised features include a Type-C cable, fast-charging support, compatibility with selected Quest headsets, and accommodation for controllers with grip covers and Elite-style straps.

    For frequent VR users, a dedicated station may make it easier to maintain an organized gaming area and return the headset to a consistent location after each session. The design may be especially relevant to users who want to keep compatible equipment together rather than leaving the headset, controllers, and cables scattered across a desk.

    However, the practical value of the dock depends on exact compatibility, the supported charging arrangement, power requirements, physical stability, and the dimensions of any aftermarket accessories. The phrase “fast charging” should not be treated as a guaranteed charging time, and controller storage should not automatically be interpreted as controller charging.

    Before selecting the TechKen model, check the current product listing and manufacturer documentation for package contents, supported headset configurations, electrical specifications, and setup instructions. Position the dock on a stable surface, manage cables carefully, and store the headset in accordance with Meta’s recommendations, especially regarding direct sunlight and ventilation.

    For additional details about the listed specifications and included accessories,

    you can check more details on Amazon here:

    As an Amazon Associate, we earn from qualifying purchases.